Sunday, January 31, 2010

Roasted Vegetables on Broiled Polenta


While looking for an alternative to the usual starchy side dish of potatoes or rice, I came across Karina's recipe for Roasted Vegetables on Broiled Polenta. It's the kind of recipe I really enjoy - a fridge cleaner. Take whatever veggies you have in the fridge and throw them on a pan. There isn't much to the recipe. No measurement or quantities. Usually I make stir fry's using this method so this roasted vegetable dish is a nice change. Using pre-cooked, store bought polenta is a real time saver too. What is polenta, you ask? It's just boiled cornmeal and it's darn tasty broiled with EVOO.

Serves 2-3

4-5 cups of assorted, chopped vegetables (I used brocoli, carrots, red onion, zucchini, beets and cherry tomatoes.)
4 cloves whole garlic, peeled
Extra Virgin Olive Oil
Herb blend of your choice (I used a Vegetable seasoning blend from Epicure)
Salt & fresh ground pepper
Splash of balsamic vinegar
1 roll of pre-cooked polenta
Shaved Parmesan for garnish

1. Pre-heat oven to 400 degrees F.

2. Place chopped veggies (including garlic) on a baking sheet. Drizzle with EVOO and sprinkle herb blend, salt and pepper over top. Toss well. Drizzle with a bit of balsamic vinegar.

3. Roast for 30-40 minutes until nearly done.

4. Meanwhile, slice polenta into thin slices and arrange them on a separate baking sheet, drizzled with olive oil. Brush tops of slices with more olive oil. I used a garlic infused olive oil for this part.

5. When veggies are nearly done, cover with foil and place on bottom rack of oven. Set oven to broil and place polenta into the oven on the higher rack.

6. Broil until polenta is sizzling, just starting to brown on top and crispy around the edges (10-15 minutes).

7. Remove everything from the oven. Arrange a few polenta slices on each plate. Take one of the roasted garlic bulbs and squish it a bit then rub it across the polenta. (Add the rest of the roasted garlic to the veggie mix and eat them whole! Yum!) Top polenta with roasted veggies. Grate some fresh Parmesan over top and drizzle with more balsamic vinegar.

Saturday, January 30, 2010

Baked Lemony Greek Rice Pilaf


This recipe is adapted from Tosca Reno's Eat Clean Cookbook. The original recipe is simply rice, broth (or water), salt and lemon juice. I wanted to jazz my rice up a bit to pair with a side of pork tenderloin, which I marinated in Souvlaki seasoning. Add a fresh Greek Salad and dinner is served!

1 cup brown rice
2 1/2 cups water or broth (chicken or vegetable)
Juice of 1/2 lemon (about 1 tbsp)
1/2 white or yellow onion, diced
1/2 green pepper, diced (I omitted this)
1/2 tbsp Greek seasoning (If you can't find a blend in the stores, you can make your own. There is a good one here
Pinch of sea salt
1 tbsp lemon zest (reserved)
1/2 tomato, seeded and diced (reserved)
fresh parsley, chopped (reserved)

1. Pre-heat oven to 350 degrees F.

2. Add rice to a casserole dish. Pour water and lemon juice over rice. Add vegetables and seasonings. Gently stir to mix everything around.

3. Place in hot oven and bake for 40 minutes or until liquid is absorbed.

4. Remove from oven and let cool a few minutes. Fold in tomato and lemon zest. Garnish with fresh chopped parsley.

Variations:

- After cooking, fold in some crumbled feta cheese
- Try dried dill weed instead of Greek seasoning

Thursday, January 21, 2010

Steamed Vegetables with Beurre Blanc


Beurre Blanc, translated directly to french, means "white butter". In culinary terms, Beurre Blanc is a butter sauce made with a reduction of white wine, shallots and melted butter. Despite being a rich sauce, it is best severed over lighter fare such as vegetables and fish.

This recipe is adapted from Christine Cushing Live.

Ingredients:
1 large shallot, very finely chopped
1/4 cup dry white wine
2 tablespoons white wine vinegar
1/2 cup cold butter, cut into small cubes
Coarse salt and freshly cracked black pepper, to taste

*It is important that your butter is COLD. Room temperature or melted butter will not work.

Directions:

1. Add shallot, wine and vinegar to a small saucepan over high heat. Stir to combine. Bring to a boil and reduce mixture to about 2 tbsp. Do not let the sauce over reduce!

2. Remove pan from heat. Start whisking the wine/vinegar mixture. While whisking, add the cold butter a little at a time. Make sure the butter melts slowly into the sauce. If the butter melts too quickly, the sauce will separate. When all the butter is emulsified into the sauce, season with salt and pepper.

3. Serve immediately over assorted steamed vegetables, or fish (I spooned some over a salmon steak as well as my vegetables).

Note: FYI - This sauce does NOT do well as left overs. If you try to re-heat in the microwave, the sauce will separate and you will end up with an oily mess.

Saturday, January 16, 2010

Pioneer Woman Beef Stew with Mushrooms


I came across the Pioneer Woman very recently and am absolutely in love with her food blog. Her photos are divine, her recipes delicious and her writing amusing and witty. Hers isn't a health food blog though... Butter rules the roost but it makes things damn tasty.

My absolute favourite of her recipes is Beef Stew with Mushrooms.

I make a few very minor adjustments when I make my version, like omitting the flour and reducing the amount of butter, but other than that, everything is the same.

Make sure you use the beef consomme instead of beef stock... it makes all the difference!

And... Be sure to check out Pioneer Woman's site and the original recipe for beautiful step-by-step photos.

Pioneer Woman Beef Stew with Mushrooms

2 pounds beef stewing meat
2 Tablespoons Butter
2 Tablespoons Olive Oil
1 whole shallot, minced (or half of one onion)
3 cloves garlic, minced
8 ounces button mushrooms (white or brown) cut in half or quarters if very large
1/2 cup red wine
1/2 can Beef Consomme (about 142 ml, or just over 1/2 cup)
1/2 cup water
Salt And Pepper, to taste
enough egg noodles to serve your guests, cooked and drained
1-2 tbsp corn starch, mixed in a small dish with a bit of water

1. Rinse beef in a colander under water. Place in a single layer between paper towels and pat dry.

2. Melt butter with olive oil over high heat in a dutch oven or other heavy pot. Place beef pieces into pot and sear a minute or two on each side. Remove from pot and set aside.

3. Reduce heat to medium-low. Add shallots to the same pot. Saute for 2 minutes. Add garlic and saute another minute. Add mushrooms and saute another couple minutes.

4. Add wine, consomme and 1/2 cup of water. Add a dash of salt and pepper to taste. Bring liquid to a boil.

5. Add the beef back to the pot. Reduce heat to low. Add thyme or rosemary. Cover and simmer over low heat for 30-40 minutes.

6. Add cornstarch mixed with water to the stew and stir occasionally to thicken for another 10 minutes.

7. Serve over cooked egg noodles. Garnish with fresh chopped parsley.

Wednesday, December 23, 2009

Crab & Cream Cheese Popovers


This recipe is adapted from the 2009 Canadian Living Holiday Cookbook. The popovers are easy to make and they taste wonderful. They are savoury and chewy with a soft, warm surprise in the centre.

2 eggs
1 cup flour (I used whole wheat)
1 cup milk
2 tbsp butter, melted
1/2 tsp salt
1/4 tsp pepper
1/2 tsp coriander
1/4 tsp cumin
1/4 tsp nutmeg
1/3 cup finely chopped green onion, plus another 1 tbsp, reserved
1/3 cup finely chopped red onion
1 small jalapeno pepper, minced
1 can crabmeat, drained
1/2 brick (125g) cream cheese, room temperature
splash of lemon juice

1. In a large bowl, whisk together eggs, flour, milk, butter and seasonings until smooth and frothy. Mix in green onion, red onion and jalapeno pepper. Cover and refrigerate for 2 hours (or up to 24 hours).

2. Meanwhile, Mix crab, cream cheese, reserved green onion and lemon juice in a small bowl. Add a pinch of salt and pepper. Set aside.

3. Pre-heat oven to 425 degrees F. Spray mini muffin tins with cooking spray.

4. Remove batter from fridge and gently whisk. Spoon batter into muffin cups to fill halfway. Add rounded teaspoon of crab mixture to centre of each muffin cup. Spoon remaining batter over top of the crab mixture to fill the muffin cups.

5. Bake in oven for 16-18 or until golden and puffed. Serve warm. Can be made ahead and refrigerated for up to 2 days or frozen for up to 2 weeks. Re-heat in 400 degree F. oven for 5-10 minutes.

Wednesday, December 16, 2009

Pot Roast Pizza


Pizza B.C. (before cheese and before cooking)

Pot roast and pizza? An odd combination for sure. It came to be one day when I had some left over slow cooker pot roast, a pizza shell and a hungry tummy. The slow cooker pot roast was so flavourful and fall-apart-fantastic that it suited the top of my pizza just perfectly. Add to that some diced onion, zucchini and some sliced mushrooms and you have a comfort food feast.

1 pizza crust - store bought or homemade. Whatever suits your fancy
1 cup pizza sauce - ditto on the above
1 small chunk of left over pot roast, pulled apart into small pieces
1/2 small zucchini, sliced and quartered
1/2 small red onion or 1 small shallot, sliced thin
3-4 button mushrooms, sliced
1/2 cup shredded cheese of your choice (I used a Tex-Mex blend tonight!)

1. Do you really need directions?


Pizza P.C. (post cheese and post cooked) and topped with fresh parsley

Tuesday, December 15, 2009

Holiday Gifts from the Kitchen - Limoncello Liqueur


Limoncello is a sweet Italian liqueur. It is easy to make and tasty to drink. The traditional way to enjoy this treat is ice cold, straight up in a shot glass. Or try it in a martini. My favourite Limoncello martini recipes follow below.

Limoncello Liqueur:

8 organic lemons
1 750ml bottle vodka
2 1/2 cups water
2 cups sugar

1. Wash lemons with a vegetable brush in hot water. Rinse well. Using a vegetable peeler or zester, peel off the rind, avoiding the white pith. The pith is bitter tasting and will affect the outcome of your Limoncello. You can also grate the zest using a Microplane, just be careful to only grate the yellow skin and not the white pith. If you end up with pith on the back of your rind, gently scrape it off using a paring knife.

2. Place the rind in a large airtight jar. Pour in vodka and seal the jar. Leave vodka in a cool dark place for at least five days and up to thirty days. The longer you leave the mix to steep, the better. The more time it has, more lemon flavour will be infused and the vodka will become brighter yellow.

3. After steeping your vodka for the desired length of time, prepare a simple syrup by mixing 2 1/2 cups of water with 2 cups of sugar. Bring to a boil and simmer gently for 10-15 minutes until sugar is all dissolved and mixture has thickened. Let cool to room temperature.

4. Mix the cooled simple syrup with the vodka/lemon mixture. Re-seal and allow to rest in a cool, dark place for another five to thirty days. If you are in a rush, you can skip the second rest period, go right to the straining in step five and instead allow the mixture to rest after it has been strained.

5. After the second rest period, strain the mixture through a coffee filter or cheesecloth lined funnel into bottle of your choice. Discard the lemon rind.

6. Store finished Limoncello in a cool, dark place for up to one year. "Connoisseurs" advocate storing your Limoncello in the freezer until ready to serve. I DO NOT advocate storing yours in the freezer because, as I learned, it actually freezes! A cold fridge is sufficient enough.


When giving as a gift, I include a scroll of Limoncello drink recipes. Here are some of my favourites:

Limoncello Limon Blush Cocktail:
1 oz Limoncello
3 oz lemonade
½ oz cranberry juice
½ oz soda water
1 lemon wedge for garnish

Add first three ingredients to a cocktail shaker with ice. Shake vigorously and strain into a tall glass filled with ice or a chilled martini glass. Top with soda and garnish with a lemon wedge.

Killer Limoncello Martini:
1.5 oz vodka
1 oz Limoncello
½ oz lemon juice
Lemon wedge or lemon peel spiral

Combine liquid in a cocktail shaker with ice. Shake vigorously and strain into a martini glass. Garnish with lemon peel or wedge.

Limoncello Fizz:
1 oz Limoncello
3 oz soda water
1 oz Ginger Ale
Squirt of lemon juice
Lemon wedge for garnish

Mix all ingredients in a tall glass filled with ice. Stir well and serve with a lemon wedge.

Monday, December 14, 2009

Holiday Gifts from the Kitchen - Vanilla Vodka


This is one of the easiest homemade Holiday gifts. It is a little on the expensive side when it comes to homemade gifts, only because vanilla beans are not cheap but the expense is worth it.

In case you are wondering, I bought my glass flasks at The Container Store. They offer a wide assortment of glass bottles and jars.

Vanilla Vodka:

Per 250ml glass jar, you will need:

1 vanilla bean
250 ml vodka (cheaper the better!)
1/2 tsp pure vanilla extract
1 coffee filter

1. Split vanilla bean. Using a small knife, run the blade up the bean to remove the seeds.

2. In a large re-sealable container, add vodka, vanilla bean and extracted vanilla seeds. Cover and store in a cool, dark place for 1-2 weeks.

3. After 1-2 weeks, set up a funnel on the glass jar and line with a coffee filter. Strain the vodka through a coffee filter, into the jar. Add pure vanilla extract. Place the vanilla bean in the jar and seal.

4. Store in a cool, dark place for up to 1 year.

Incidentally, if you concentrate the vanilla flavour (reduce the amount of vodka and increase the amount of vanilla beans), you will eventually create homemade vanilla extract!

Saturday, December 12, 2009

Holiday Gifts from the Kitchen - Peanuty Chocolate Oreo Cookie Bark


This is another recipe from the Kraft Kitchens. I've made this one for a few years now and it is very easy and very good. Who doesn't like chocolate, peanut butter and Oreo cookies!?

1 box (8 squares) BAKER'S Semi-Sweet Chocolate
1 box (6 squares) BAKER'S White Chocolate
2 Tbsp Smooth Peanut Butter (I used 3)
10 OREO Cookies, smashed

1. PLACE semi-sweet chocolate and white chocolate in separate medium microwaveable bowls. Microwave until completely melted, following directions on package. Add peanut butter to white chocolate; stir until well blended. Crumble half the cookies over chocolate in each bowl; mix well.

2. DROP spoonfuls of the chocolate mixtures onto waxed paper-covered baking sheet, alternating the colours of the chocolates. Swirl gently with knife. Top with more crumbled cookies.

3. REFRIGERATE 1 hour or until firm. Break into pieces. Store in airtight container in refrigerator.

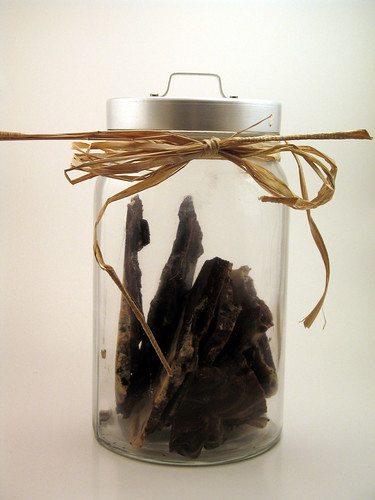
I alternate between serving the bark in glass jars (as shown) or Christmas Asian-style take out boxes (below).

Variation: Instead of peanut butter & Oreos, use dried cranberries and chopped macadamia nuts. I made a batch using cherry flavoured dried cranberries and dry roasted macadamia nuts. It created a sweet and salty treat, perfect for someone that prefers salty snacks.


Thursday, December 10, 2009

Holiday Gifts from the Kitchen - Accidental Toblerone Fudge Sauce

Hello! I've taken some time off cooking. Well, that isn't exactly true. I'm still cooking but nothing has been deemed worth of posting here. Although the pot roast, mushroom and zucchini pizza I made last night was pretty delicious.

With only two weeks till Christmas, I've been very busy. My shopping is all done. My presents are all wrapped and my Christmas crafting is nearly complete. I don't usually bake around Christmas time. I'm not much of a baker. I'm more of a creator. This year I created homemade Limoncello liqueur, Vanilla Vodka, Toblerone Fudge Sauce and Peanuty Oreo Cookie Bark. The results are pretty darn good, in my opinion.


Today I will share my Accidental Toblerone Fudge Sauce. Accidental because I set out to make a KRAFT Kitchen's Toblerone Fudge recipe. Unfortunately my fudge didn't set and I needed to come up with something to salvage the $10 worth of chocolate that was in my pan. This recipe is not healthy. It isn't wholesome. It isn't cheap. But it is sinfully delicious. That is why I'm giving almost all of my fudge sauce away as gifts.

If you are interested in the original Toblerone Fudge recipe, check here.

Jill's Accidental Toblerone Fudge Sauce:

Yields about 8 cups - Enough to fill 4 - 500ml canning jars

1 cup sugar
1 cup butter
3 cups full fat evaporated milk (about 2 large cans)
600g Toblerone (That is one full and a one half of the 400g large holiday bars or 6 smaller 100 g bars)
6 squares bakers chocolate (semi-sweet or bitter-sweet)

1. Coarsely chop all chocolate and set aside.

2. Mix sugar, butter and evaporated milk in a sauce pan. While stirring constantly, slowly bring to a rolling boil over medium heat. Let boil for five minutes will continuing to stir.

3. Remove sauce pan from heat. Pour chopped chocolate into sauce pan and stir until completely melted.

4. Let cool to room temperature. Sauce should be of a thick consistency and coat the back of a spoon, yet still pour easily. If sauce is too thick, stir in more condensed milk, 1/4 cup at a time. If sauce is too runny, more chocolate may need to be added.

5. Spoon or pour sauce into airtight jars. I used 500ml canning jars and boiled them after, per box instructions, to form a proper airtight seal.

6. Store jars in refrigerator.

Chocolate Sauce Uses:
- Heat a bit in the microwave and spoon over ice cream, cream puffs, pancakes and other desserts.
- Add to milk for rich and creamy chocolate milk
- Serve as is over ice cream

Related Posts with Thumbnails